Description
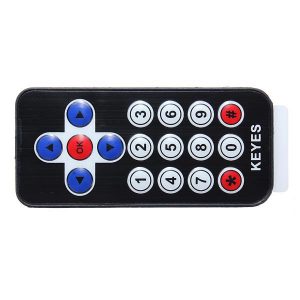
This is an Infrared IR wireless Remote Control Kit for Arduino and 38 KHZ infrared receiving module, the Mini ultra-thin has 17 function keys, the infrared emission furthest distance up to 8 meters, Infrared remote control receiving module can receive standard 38 KHZ modulation signals, by means of programming the Arduino, the remote control signal decoding operation can be realized, which can produce all kinds of remote control robots and interactive work.
Features
- Transmission Frequency: 38KHz;
- Transmission Distance: up to 8m (depending on the surrounding environment, sensitivity of receiver etc)
- Effective Angle: 60
- Static Current: 3~5uA,
- Dynamic Current: 3~5mA
- Suitable for Arduino, PIC ,AVR and other development boards
Application
- It is very suitable for indoor control devices of all kinds.
- Suitable for robots control
- Suitable for control things at distance like lights and so on.
How to get started with IR remote control
In this infrared remote kit, ther is an Infra Red remote, Infra Red receiver and an Infra Red Emitting Diode (IRED). In this article we are going to show you how to get startes with this remote control kit and control your arduino.
ThIS is an easy-to-connect. It can be plugged into a Arduino with a 3-pin cable from the Infra Red receiver and you can control your arduino with these.
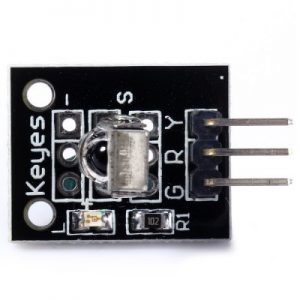
The pinout of Infra Red reciever

The first pin from the bottom is the Ground, the next pin is the 5V power supply pin for IR receiver and the last pin above is signal out pin marked with S to which pin sends data.
Hardware setup
Hardware needed:
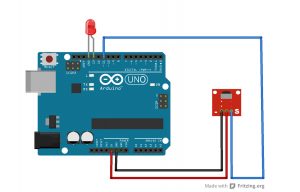
First we are going to connect the IR receiver to Arduino to determine the code for each key on our remote key pad. Set the connection as follow:
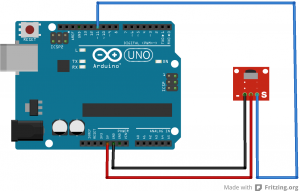
Connect the Signal out Pin to the Arduino pin D11 and GND to theground pin of the IR receiver and 5V pin on Arduino to the middle pin of theIR receiver.
Installing the library
You must download and install this library of IRremote into your Arduino library folder. For people who have newer version of Arduino with a library IRRobotRemote, it may conflict and you may have to remove that library. Make sure to delete Arduino_Root/libraries/RobotIRremote. Where Arduino_Root refers to the install directory of Arduino. The library RobotIRremote has similar definitions to IRremote and causes errors. For windows user who have installed the Arduino IDE, go to C:Program Files (x86)Arduinolibraries and delete a RobotIRremote.
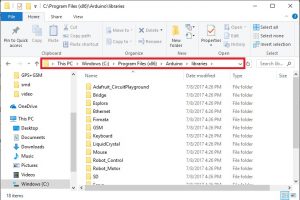
Extract the file in your libraries directory (C:UsersGwizaDocumentsArduinolibraries)
Note: For info on easier Library Installs, refer to this link, also remember to insert a Lithium battery in the back of the remote as the kit comes without a battery. If your Arduino IDE doesn’t load the library, try renaming the library folder to IRremote only and remove the “-master”
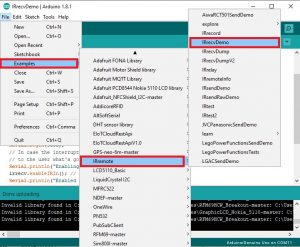
Open your Arduino IDE and go to Files/Examples/IRremote and open the sketch IRrecvDemo an upload to your Arduino
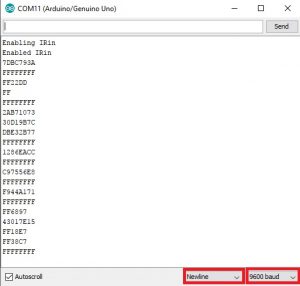
Once you have completely uploaded the Arduino sketch, Open your Serial monitor set the baud rate to 9600 and take your remote and start pressing on the key and observe what the serial monitor show. Here is mine
Record the Buttons
Here are the code that I got from the remote. FFFFFF is a repeat command, you’ll get a stream of them if you hold down a button.
- UP FF629D
- UP FF629D
- DOWN FFA857
- OK FF02FD
- RIGHT FFC23D
- LEFT FF22DD
- 1 FF6897
- 2 FF98673 FFB04F
- 4 FF30CF
- 5 FF18E7
- 6 FF7A857 FF10EF
- 8 FF38C7
- 9 FF5AA5
- 0 FF4AB5
- * FF42BD
- # FF52AD
You can also try to work with other Remotes like those for TV and Radio system and so on…
Mapping the Keys
The Remote in this kit is especially good for remote control of a small robot, using the arrow buttons.Here is an example Arduino code for this remote. The reported buttons will be Forward, Left, Right, Reverse (for the 4 blue button), OK for the red ‘OK’ button, 1 to 0 for the white number buttons, and ‘*‘and ‘#‘ for the bottom red buttons.Connect as on the previous circuit scheme.

Controlling LED with IR remote
We are going to control the LED on digital pin 13 on Arduino UNO. The sketch used in this case can be enhanced and used into controlling s toy car that has a IR receiver to control it. in this setp you will need a LED to get this working and the kit.
Wire your IR receiver as shown below and add LED on Digital pin 13 and upload the following code onto your Arduino UNO board and press UP to turn the LED on and press DOWN to turn LED off.
Further Resources:
Arduino Library: IRremote libary
Arduino Sketches: